

Disclosure: This article contains Amazon affiliate links. If you buy through these links, Logik Press may earn a small commission at no extra cost to you.
Cybersecurity starts to feel real when you can use the terminal without freezing.
That does not mean you need to memorize hundreds of commands before you touch a lab. It means you need a small command set that helps you answer beginner questions calmly: Where am I? What files are here? What changed? Who owns this? What is running? What is listening? What does the log say? Am I allowed to touch this system?
Those questions matter more than command trivia. A beginner who can orient, inspect, search, and document will get more out of cybersecurity labs than someone who only copies commands from a walkthrough.
This guide walks through the Linux commands worth practicing before beginner cybersecurity labs. Keep the scope simple: use your own computer, your own Linux virtual machine, Windows Subsystem for Linux, localhost, or a lab environment you have permission to use.
Start With Scope Before Commands
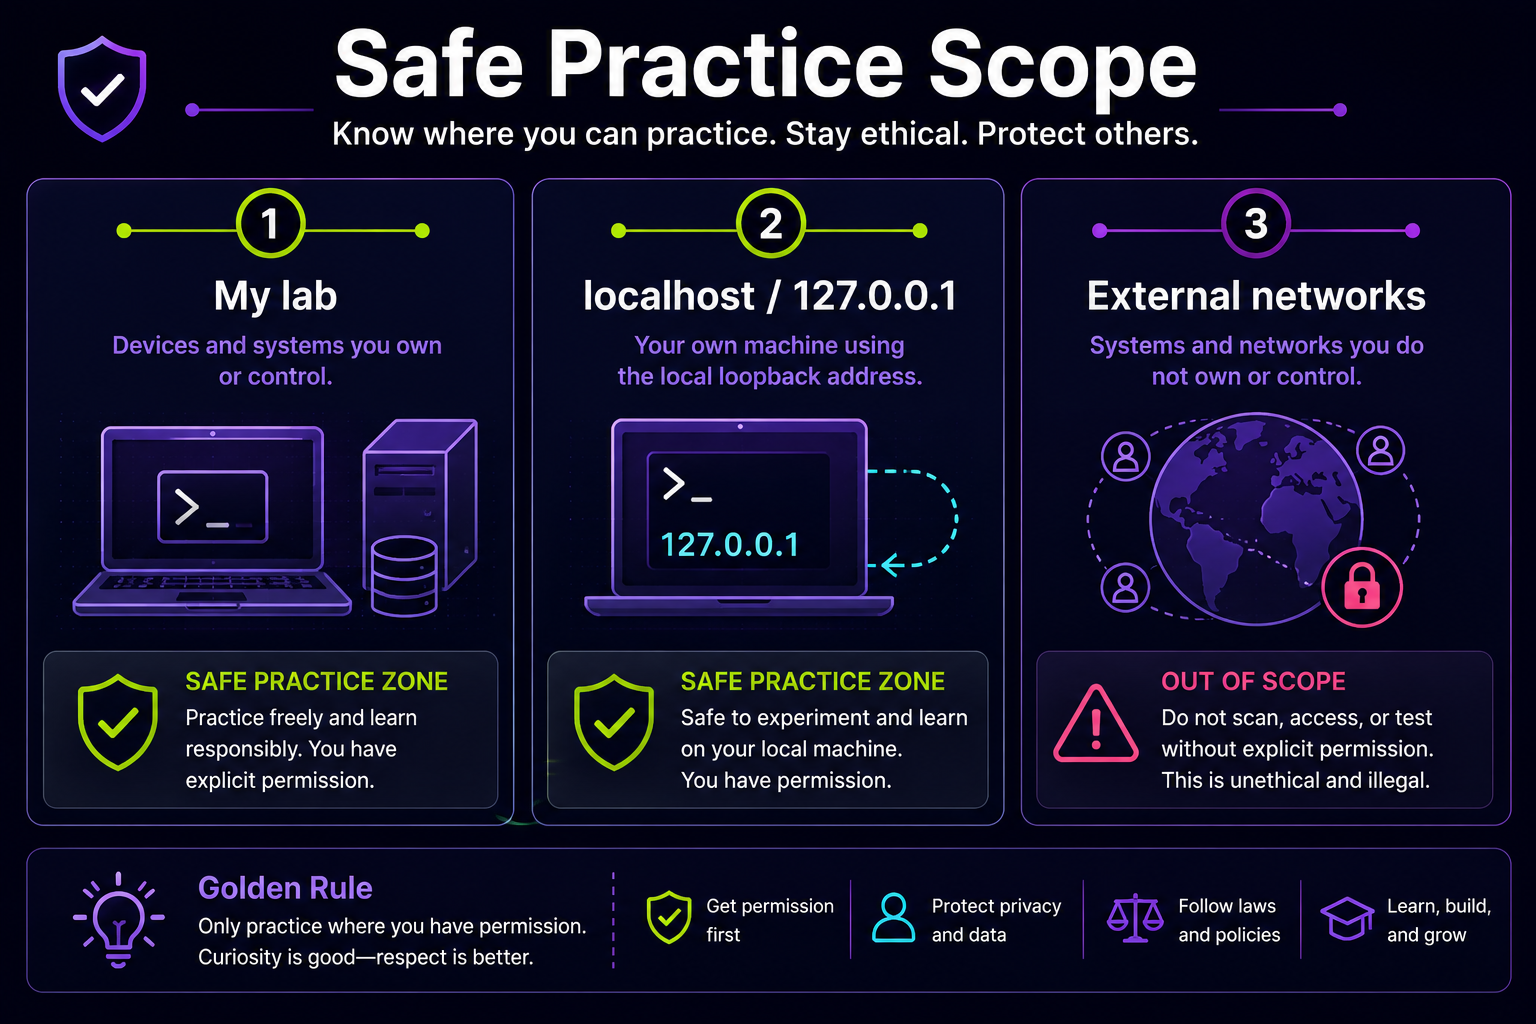
Before you run any cyber-flavored command, decide what you are allowed to touch.
- Your own Linux lab.
- Your own files and folders.
localhostor127.0.0.1.- A training platform or lab where you have explicit permission.
- A device or network you own and understand.
Do not scan random public IPs, workplace networks, school networks, hotel Wi-Fi, neighbors’ devices, or anything you do not control. Curiosity is good. Permission is better.
1. Orientation Commands
Orientation commands answer the basic question: “Where am I and what am I using?” Practice these first:
whoami
hostname
pwd
date
uname -a
whoami shows the current user. hostname shows the system name. pwd prints your current folder. date gives the system time. uname -a gives kernel and system information.
These commands are simple, but they build one of the most important beginner habits: check context before acting.
mkdir -p ~/linux-cyber-lab/evidence
whoami > ~/linux-cyber-lab/evidence/orientation.txt
hostname >> ~/linux-cyber-lab/evidence/orientation.txt
pwd >> ~/linux-cyber-lab/evidence/orientation.txt
date >> ~/linux-cyber-lab/evidence/orientation.txt
2. Files and Directory Commands
Most beginner security work includes file questions. What is here? What changed? What can I read? What should I not touch?
ls
ls -la
cd path
mkdir -p folder
touch file.txt
cp source target
mv old-name new-name
rm file.txt
Use ls -la often. It shows hidden files, permissions, owners, groups, sizes, and timestamps.
mkdir -p ~/linux-cyber-lab
cd ~/linux-cyber-lab
mkdir notes evidence scripts logs
touch notes/session-001.txt
ls -la
Be careful with rm. It deletes. In a lab folder, that is fine. Outside your lab, slow down.
3. Text Reading Commands
Linux systems are full of text: logs, config files, scripts, command output, service files, and notes.
cat file.txt
less file.txt
head file.txt
tail file.txt
tail -n 20 file.txt
wc -l file.txt
Use cat for short files. Use less for longer files. Use head and tail when you only need the beginning or end. Use wc -l when you want to count lines.
tail -n 50 logs/app.log
tail -f logs/app.log
tail -f follows new log lines as they appear. Press Ctrl+C to stop.
4. Search Commands: grep and find
When you start labs, you will search constantly. You will search files, logs, folders, names, timestamps, and output.
grep "failed" logs/auth.log
grep -i "failed" logs/auth.log
grep -n "login" logs/auth.log
grep -Rni "error" .
The -i option ignores case. The -n option shows line numbers. The -R option searches recursively.
find . -type f
find . -name "*.log"
find . -iname "*auth*"
find . -type f -mtime -1
find answers filesystem questions. grep answers text questions. Together, they are a beginner analyst’s first real toolkit.
5. Permissions Commands
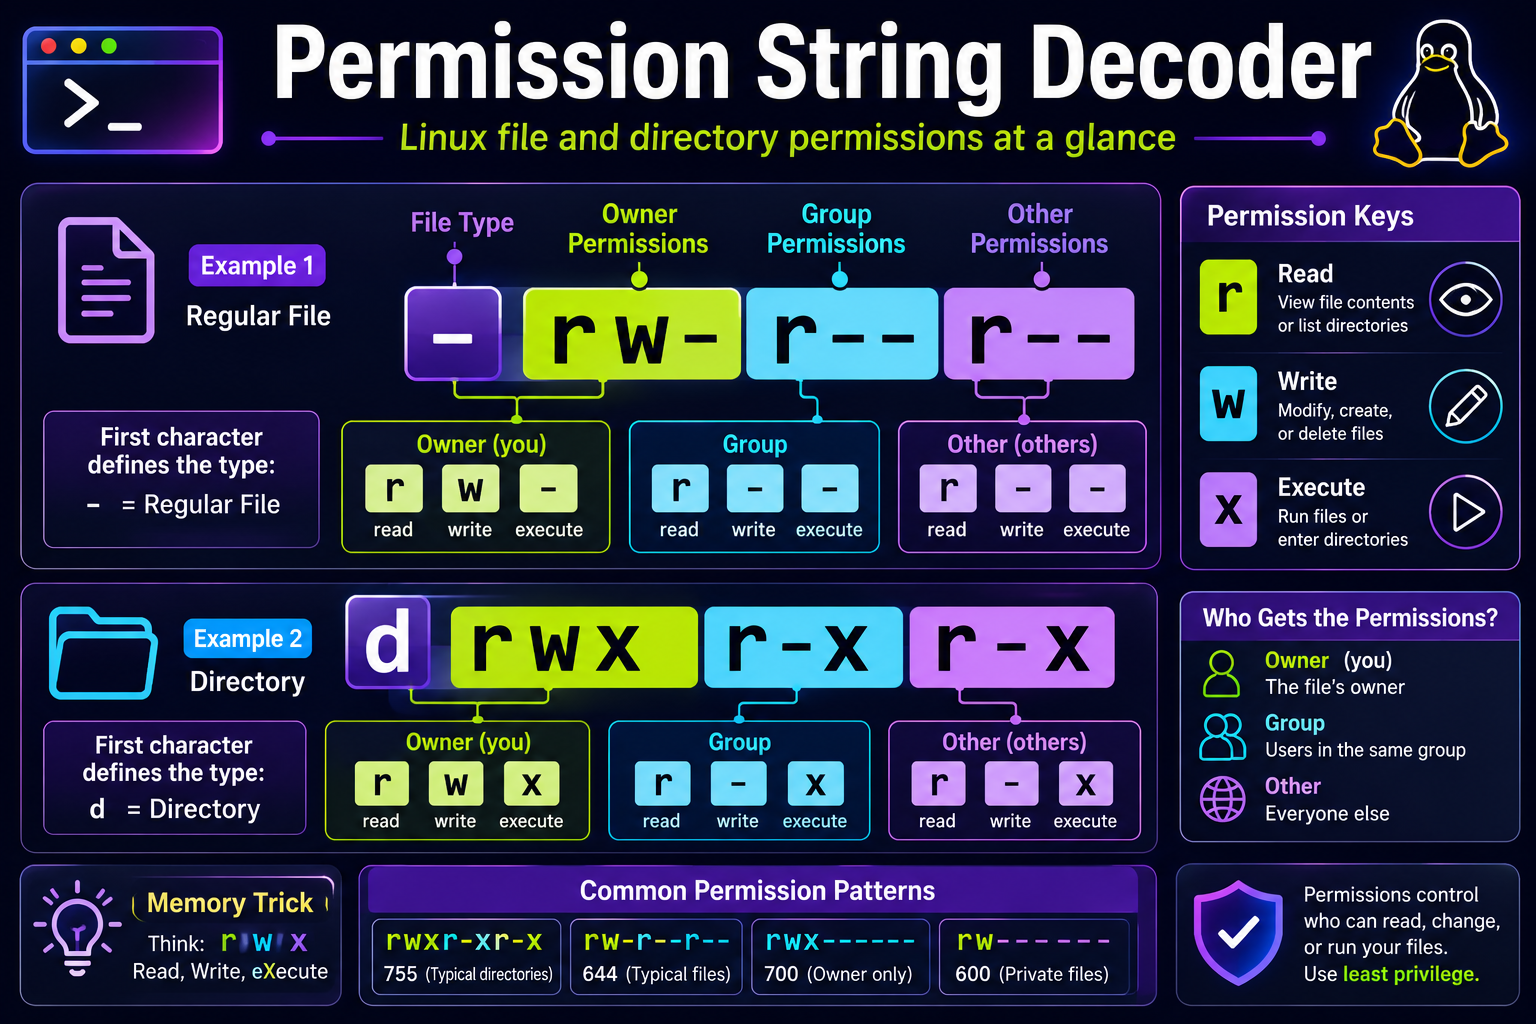
Permissions tell you who can read, write, or execute files.
ls -l
id
groups
chmod u+x scripts/example.sh
chmod 644 notes/session-001.txt
The output from ls -l can look like this:
-rw-r--r-- 1 user user 120 Jun 12 10:30 notes.txt
drwxr-xr-x 2 user user 4096 Jun 12 10:31 scripts
The first character tells you the type. A dash means regular file. A d means directory. The next nine characters show permissions: r is read, w is write, x is execute or enter, and - means the permission is missing.
printf '#!/bin/sh\necho "hello lab"\n' > scripts/hello.sh
ls -l scripts/hello.sh
chmod u+x scripts/hello.sh
ls -l scripts/hello.sh
./scripts/hello.sh
Do not change permissions on system files just to experiment. Permissions can break things or expose data when changed carelessly.
6. Process and Service Commands
Processes are running programs. Services are background processes managed by the system.
ps
ps aux
pgrep -a ssh
top
systemctl status ssh
systemctl list-units --type=service --state=running
Use ps aux to see running processes. Pipe it into less when the output is too large:
ps aux | lessChecking service status is safe. Restarting a service is a change. Save restarts for your own lab until you understand the impact.
7. Local Networking Commands
Networking commands are useful, but this is where beginners must be extra careful.
ip addr
ip route
ping -c 4 example.com
curl -I https://example.com
ss -tulpen
ip addr shows network interfaces and addresses. ip route shows routing. ping -c 4 sends four packets and stops. curl -I asks for HTTP headers. ss -tulpen shows listening sockets and network state.
If a training lab introduces nmap, keep it scoped:
nmap 127.0.0.1Do not scan systems you do not own or have permission to test. The professional habit is permission first.
8. Log and Evidence Commands
Logs help you understand what happened. They are not perfect proof, but they are often the best first clue.
journalctl -n 50
journalctl -p warning -n 50
journalctl --since "1 hour ago"
grep -Rni "failed" .
Some systems restrict log access. Some environments do not use systemd. If journalctl does not work, read the error and learn what your system supports.
mkdir -p ~/linux-cyber-lab/evidence
date > ~/linux-cyber-lab/evidence/session-notes.txt
echo "Checked files, permissions, processes, networking, and logs." >> ~/linux-cyber-lab/evidence/session-notes.txt
A 20-Minute Practice Loop
mkdir -p ~/linux-cyber-lab/{notes,evidence,logs,scripts}
cd ~/linux-cyber-lab
whoami
hostname
pwd
ls -la
find . -type f | sort
id
groups
ps aux | head
ip addr
ip route
Then write three notes: what did I inspect, what looked normal, and what do I need to learn next?
That loop builds confidence without pretending to be advanced.
What Not To Do Yet
- Do not run commands you cannot roughly explain.
- Do not use
sudojust because a tutorial says so. - Do not scan networks outside your scope.
- Do not change permissions on system folders for practice.
- Do not copy and run remote scripts blindly.
- Do not confuse “I found a log line” with “I proved an incident.”
- Do not publish screenshots containing tokens, keys, IPs, customer data, or private notes.
Beginner cybersecurity is not about looking dangerous. It is about becoming reliable.
The Best Next Step
Pick a small command set. Practice in your own lab. Keep notes. Repeat.
If you want a guided path, Linux for Cybersecurity Beginners was built for exactly this stage: files, permissions, processes, networking, logs, and safe practice habits without hype.
Start with the commands above, then use the book as your first terminal field guide while you build confidence one session at a time.
Get the book: Kindle edition of Linux for Cybersecurity Beginners or paperback edition of Linux for Cybersecurity Beginners.
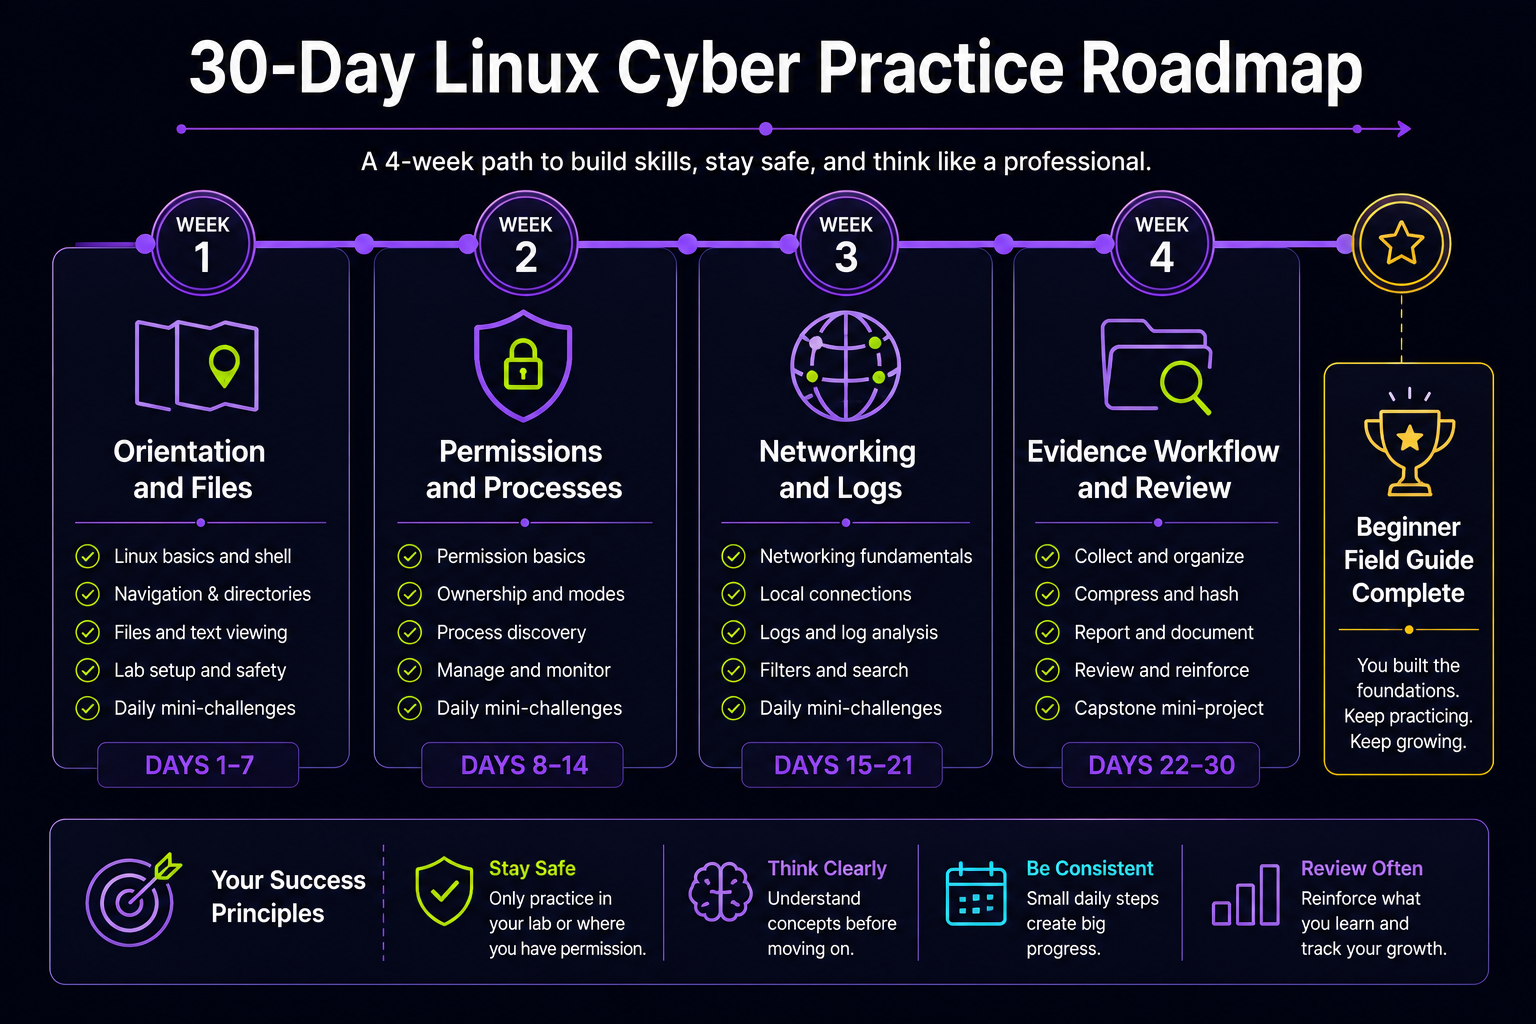
Free Roadmap
Want a simple practice path before your next lab? Download the free 30-Day Linux Cyber Practice Roadmap, then keep the Logik Press Free Resource Library nearby for future checklists and book updates.
Download the 30-Day Linux Cyber Practice Roadmap PDF
Visit the Logik Press Free Resource Library
References
- GNU Coreutils manual
- GNU grep manual
- GNU findutils manual
- Linux man pages
- systemd journalctl manual
- curl manual
- NIST Cybersecurity Framework
 Cybersecurity Beginner Lab
OSCP Prep Tracker: A 100-Day Study Log for Authorized Labs
 Cybersecurity Beginner Lab
Metasploit Lab Notes Journal: A Cybersecurity Lab Notebook For Authorized Practice
 Cybersecurity Beginner Lab